Showing posts with label baking. Show all posts

Sunday, June 17, 2012

Zucchini Bites

I had to try this after seeing it so many times on pinterest and knowing how deeply I love zucchini. So I'll spare you the chit chat and we can get right to the action. I made mine in a regular muffin tin so of you do the same. Add an extra 5-10 minutes bake time.

Zucchini Bites


- 1 cup zucchini, grated

- 1 egg

- 1/4 yellow onion, diced

- 1/4 cup Parmesan cheese

- 1/4 cup Italian style bread crumbs, or whatever you have on hand

- salt and pepper to taste


1. Preheat oven to 400 degree F. Spray a mini-muffin tin with nonstick spray, set aside.

2. Grate the zucchini and then place in a dish towel to squeeze out the excess water, like when using frozen spinach. If you skip this part, the middle of the zucchini bites will be really soggy while the outside gets crispy.

3. In a bowl combine, the egg, onion, cheese, bread crumbs, zucchini, salt and pepper.

4. Using a spoon or a cookie scoop, fill the mini muffin cups to the top. Bake for 15-18 minutes, or until the top is browned and set. If you are using a regular muffin tin add 5-10 minutes bake time.

Thursday, March 1, 2012

Easy Chicken Pot Pie

Chicken pot pie brings back some special memories for me everytime I see it or eat it. I always remember being a child and asking my dad on Sunday nights what was for dinner and he would reply, "chicken pot pie and I don't care" every time. It was a Sunday night staple when I went to see my dad and I love it. Back then thought it was usually willow tree chicken pie and a side of vegetables. This recipe puts it all together as one and takes almost no time at all to prepare.

Easy Chicken Pot Pie

Ingredients:
  • 1 can (10 3/4 oz) condensed cream of chicken soup, undiluted
  • 1 can (10 3/4 oz) condensed cream of mushroom soup, undiluted
  • 1/2 cup milk
  • 1/2 teaspoon dried thyme
  • 1/4 teaspoon of pepper
  • 1/8 teaspoon of poultry seasoning
  • 2 packages (16 oz each) of frozen mixed vegetables, thawed
  • 1 1/2 cups cubed cooked chicken
  • 1 package of jumbo biscuits
  1. In a large bowl combine the soups, milk, thyme, pepper, and poultry seasoning. Stir in vegetables and chicken.
  2. Transfer to a greased 13x9 greased baking dish. Top with jumbo biscuits.
  3. Bake uncovered at 350degrees for 40-50 minutes or until filing is bubbly and biscuits are golden brown.

Monday, February 27, 2012

Freezeable?

A lot of people ask me how I cook, bake, prepare food for one person. I didn't always have a great system in place. I used to make a meal and that was all I ate all week for lunch and dinner because it's difficult to make lasagna for one. Over time I have made a system for myself of portions and freezer storage. This has, believe it or not, saved me money and time. I find myself spending most of the weekend, when I have free time, baking and cooking meals to my hearts content. I will make a different lunch and dinner each day and portion it out so I can freeze the remained into "frozen dinners" if you will. Then during the week I have an assortment of things to eat for lunch and dinner and I don't have to listen to people say, "Lasagna again?!"

When I do tell people what my system is, they usual say something like "I didn't think you could freeze that." So I recently came across this great blog article by a stay at home mom named Andrea. It was so through and really makes it easy for someone new to freezing to understand the ins and out. So instead of me posting all my tips and tricks, feel free to take a look at Freezeable Foods. You might even find a new trick or two to save your self the two thing we could all use more of: time and money.
This is the inside of my freezer.

Sunday, February 26, 2012

DIY Vanilla Extract

I started making my own vanilla extract when I was in college and on a much tighter budget than I am now. I did some research and found that it is extremely easy to make and super cost effective. Plus it I personally feel if gives more vanilla flavor to whatever your making that store bought extract, and saves you a bunch of money. You basically need 3 items which you can get for under $5: stick vanilla beans, liquor, and a jar. I personally save every glass jar that comes into my kitchen so I have one that I reuse to make my vanilla extract.

So what do I do?
Now all you are going to do is add these things together, shake, and wait. That simple!

What type of liquor?
For picking your liquor, I personally prefer vodka because of its neutral or flavorless quality allowing the vanilla to really do it's thing and come through. You can try experimenting with many different type of liquor, some people prefer to use rum, but whatever liquor you choose make sure it is AT LEAST 80 proof (or 40% alcohol.) I prefer 100 proof. You won't need to worry about anything having a "alcohol" taste to it because when heated sufficiently, the alcohol burns off leaving you with just the aromatic and flavorful vanilla essence.

Where can I find whole vanilla beans?
Sometimes you need to shop around for this. I find that buying from a tea shop or herb supply/holistic store is going to give you the best product and cheapest cost. I usually am able to purchase 1-3 bean for less than $1 at a tea and herb shop nearby my house. Some people have a few online sources that they like but I haven't done enough research to point you in the proper direction. If you have a great online resource for herb and spices please feel free to comment below.

How do I prepare it?
Preparing your vanilla extract is simple.

Your first step is to prepare your glass jar by sterilizing it. You can do this by placing the jar open side down in a pot of boiling water. Make sure to sterilize the lid as well. Let them boil for 10 minutes to completely sterilize. Once the jar is sterilized and cool you can prepare your extract.

For every 1-3 vanilla beans, depending on their size, you will need 1 cup of liquor. Cut the beans open lengthwise with a pair of scissors or a sharp kitchen knife to expose the beans and place in a clean glass jar that has been sterilized. The cover your beans with liquor. Make sure the jar seals tightly and give it a few shakes.

Once prepared, you will need to place the jar in a dark, cool cabinet and leave it there for around 2 months, shaking it one or two times each week. Over time you will see the liquid getting darker. (If you used rum, don't be surprised if it does not appear to get that much darker as the liquor its self is a darker color.)

After 2 months, feel free to use and enjoy it often. One of the best things about this is that you can continue to add to it by refreshing it with vanilla beans and liquor. Because it's primarily alcohol it can last a seeming eternity. So go on now, give it a try.

Saturday, February 25, 2012

Cake Balls (and Pops too!)

Tonight I am making a tried and true favorite of mine: cake balls.

I have been a huge fan of bakerella since way back in the day. (AKA when I was in high school.) Tonight when I was out shopping I found a cherry chip cake mix and thought, I have red candy melts at home. LET'S DO THIS! So here I am making cake balls/pops.
Cake Pops!

I had bought a machine to try and make them because before I thought that the process was tricky and possibly to fattening. So the idea of making just cake balls with no frosting seemed like a good idea. Let me tell you, in my opinion, this machine was a waste of my money. The balls didn't bake right and tasted smokey and we a far cry from the delishness of an original cake pop. So if anyone wants this machine, let me know. I used it once and I don't plan to use it again!

Making cake balls (or pops) is worth the extra seemingly difficult steps it may take.

What you will need is:
  • 1 box cake mix
  • 1 can frosting
  • wax paper
  • candy melts
  • sprinkles (optional)
Next you will need to follow some not so complicated steps:
  1. Bake your cake mix like you normally would and allow to cool. Once cooled, cut the cake into 4 even sections. Rub the cake together over a large bowl to crumble evenly. Add in the frosting and stir.
  2. Use your hands or a cookie dough scoop to roll the "dough" into even balls no bigger than a quarter. Place the balls on a piece of wax paper on a cookie sheet.
  3. Place the sheet in your freezer for 15 minutes to cool. After 15 minutes, transfer to your fridge and prepare your candy melts.
  4. To make cake balls, place a tooth pick in each of the balls then dip into the candy melts until completely covered. Make sure to tap off any excess. And place on wax paper or into cupcake papers. Remove tooth pick and use tooth pick to fill in the cake ball hole with candy melt. Decorate however you like or allow candy melt to harden.
  5. To make cake pops, place pop stick in candy melt to get a tiny bit on the end and press gently into cake ball. Allow to harden. Dip cake pop into candy melts and cover completely tapping the end of the pop stick gently to shake off excess candy melt. Place the end of the pop in a styrofoam block or cake pop decorating tray to allow to harden.
That's pretty much it with endless decorating possibilities! Have fun with it. It really is worth all the steps, so don't try to skip out and use a cake ball maker! These are the ones I made:

Friday, February 24, 2012

Repeats!!

Tonight I was super lazy and tired so I decided to redo a recipe I previously did. Minty chippy brownies never disappoint! It had been a long day at work so I decided I needed a reward. This would be it.

Sunday, February 19, 2012

Strawberry Muffins

I meant to post this a while back but completely forgot. It has been a super busy past few weeks. Maybe two or so weeks ago my friend Emily crashed at my house. She had been going through a really rough in her life and I was trying to think of what I could do to brighten her morning. Well, can I say, nothing cheers me up quite like a delish dish. So I baked her breakfast. We both are unnatural red heads so I wanted to go with something red or pink, so strawberry muffins it is. The only thing I did different than the below recipe is that I used dehydrated strawberries. I have been dehydrating a lot lately because I am a single person who loves a vast variety of fruits but never can seem to eat them fast enough. Hence, dehydrating and storing.

Any way, with out further adue:

Strawberry Muffins

Ingredients

  • 1/4 cup canola oil
  • 1/2 cup milk
  • 1 egg
  • 1/2 teaspoon salt
  • 2 teaspoons baking powder
  • 1/2 cup white sugar
  • 1 3/4 cups all-purpose flour
  • 1 cup chopped strawberries

Directions

  1. Preheat oven to 375 degrees F (190 degrees C) oil an 8 cup muffin tin, or use paper liners.
  2. In a small bowl, combine oil, milk, and egg. Beat lightly. In a large bowl, mix flour, salt, baking powder and sugar. Toss in chopped strawberries and stir to coat with flour. Pour in milk mixture and stir together.
  3. Fill muffin cups. Bake at 375 degrees F (190 degrees C) for 25 minutes, or until the tops bounce back from the touch. Cool 10 minutes and remove from pans. 
FYI: I use a dough scoop to make my muffins into more small ball like entities.  Then I wind up with more muffins and smaller servings, since I am trying desperately to lose weight.

Nutritional Information 

Amount Per Serving  Calories: 233 | Total Fat: 8.2g | Cholesterol: 28mgAllRecipes.com

Sunday, January 29, 2012

Sundried Tomato Basil Bread

I have been searching the world over for the perfect tomato basil bread. This one, cold very well be it. It's been a lengthy process to make this bread and it was well worth it. To get the best taste of tomato I opted for dehydrating tomatoes instead of buying sun dried tomatoes. It has been a full day affair but my house smells yummy and the bread.. oh divine!

Sundried Tomato Basil Bread


  • 2 hrs
  • 2 hrs 15 min
  • 1 8 x 4-inch loaf

Ingredients

  • 1 cup warm water
  • 2 tbsp olive oil
  • 3 cups unbleached all-purpose flour
  • 2 tsp sugar
  • 1 1/2 tbsp chopped dried basil
  • 1/2 cup chopped sundried tomatoes
  • 1/2 tsp salt
  • 2 1/4 tsp active dry yeast

Directions

  1. Dissolve yeast in warm water in the bowl of stand mixer. Add 2 cups of the flour and all other ingredients to the batter and mix with dough hook until just combined.
  2. Add remaining flour a little bit at a time until dough no longer sticks to the sides of the bowl.
  3. Remove dough from bowl and place in a clean, lightly-greased bowl, cover and let rise until doubled. This will take approximately 1 hour.
  4. Punch down risen dough and shape into an oval, stretching from the top of the loaf to underneath the bottom. Place shaped loaf in a lightly-greased 8 x 4-inch loaf pan, cover and let rise until doubled. (about 30 minutes.)
  5. Preheat oven to 350 degrees F. Bake 15-20 minutes until golden brown. Remove from oven and allow to cool completely on a wire rack before slicing.

Friday, January 27, 2012

Minty Chippy Blondies

I had a super hankering for blond brownies (aka blondies) yesterday. I also found this bag of mint chocolate chips in my cabinet and decided to combine the two. Unfortunately I was not able to get a super great picture because when I tried to remove my blondies from the pan, they kinda fell apart and stuff because I was to excited and didn't let them cool enough or whatever. You get the idea.

Make them for yourself and you will know. Oh you will know the wonderfully delissshhhness that is blondies.

Minty Chippy Blondies

Ingredients
  • 6 tablespoons butter, softened
  • 1 cup packed brown sugar
  • 2 eggs
  • 1 teaspoon vanilla extract
  • 1 1/4 cups all purpose flour
  • 1 teaspoon baking powder
  • 1/2 teaspoon salt
  • 1 cup of mint chocolate chips (or you can substitute regular chips, butterscotch, or whatever flips your lid)
  1. In a  large mixing bowl, cream butter and brown sugar until light and fluffy. Add the eggs, one at a time, beating well. Beat in vanilla. 
  2. Combine flour, baking powder and salt. Gradually add to the creamed mixture until blended. Stir in chocolate chips
  3. Spread into a greased 11x7 baking pan. Bake at 350 degrees for 25-30 minutes or until toothpick inserted in center comes out clean. Cool on a wire rack.

Thursday, January 26, 2012

Beef and Spinach Lasagna

Excuse the terrible cell phone food porn. I wish my camera was not missing. I am totally obsessed with this lasagna. OBSESSED! I went back and forth between what I wanted to have for dinner. Whether I should order out or just make this lasagna. I decided on making lasagna and I am so glad that I did. I totally was craving this. You know when you have a bad day and you are just craving a comfort food. This day, this food. Spot, hit. Haha. Sorry I'm so corny. I'm sharing the 'diet' version of the lasagna. I didn't make the 'diet' version this time. So feel free to do the 'diet' lasagna or not. Either way its yummy noms.

Beef and Spinach Lasagna

Ingredients
  • 1 lb lean ground beef
  • 1 medium onion chopped
  • 2 jars of 26oz meatless spaghetti sauce
  • 4 garlic cloves, minced
  • 1 teaspoon dried basil
  • 1 teaspoon dried oregano
  • 1 package (10oz) frozen chopped spinach, thawed and squeezed dried
  • 2 cups ricotta cheese
  • 2 cups (8oz) shredded part-skim mozzarella cheese, divided
  • 9 no cook lasagna noodles
  1. In a large skillet, cook the beef and onion until meat is browned. Drain.
  2. Stir in the spaghetti sauce, garlic, oregano, and basil. Bring to boil. Reduce heat, cover and simmer 10 minutes.
  3. In a large bowl, combine spinach, ricotta, and 1 cup mozzarella.
  4. Spread a thin layer of meat sauce in a greased 13x9 baking dish. Top sauce with 3 noodles. Spread layer of sauce over noodles and spread to cover noodles. Layer with half of the spinach mixture. Repeat layers. Top with remaining noodles, sauce, and mozzarella.
  5. Cover and bake at 375 degrees for 30 minutes. Uncover and bake an additional 10-15 minutes or until bubbly. Let stand for 10 minutes before cutting.
Serves 12
Nutrition Facts: 1 piece equals 281 calories, 11g fat (6g saturated fat), 50mg cholesterol, 702mg sodium, 26g carbohydrate, 3g fiber, 20g protein.

Recipe and Nutrition Information from The Comfort Food Diet

Saturday, January 7, 2012

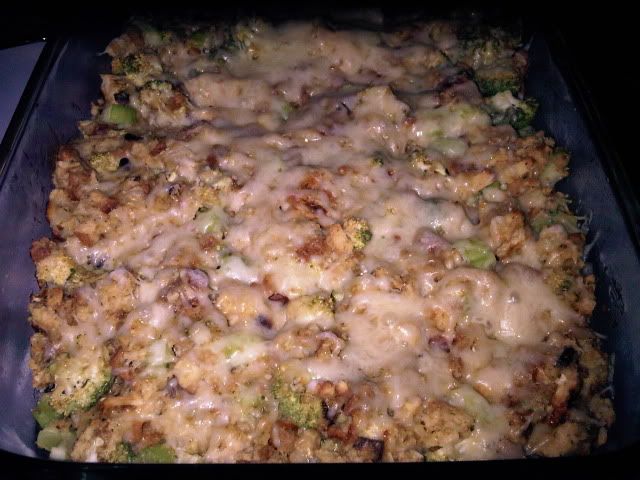
Chicken Stuffing Bake

Pardon the terrible cell phone picture but this is by far the best chicken dish I have made in a long time. It's super easy and reheats well. Also it combines my favorite things: chicken, cheese, and stuff. I mean come on, who doesn't love stuffing. I got the recipe from a diet cook book, but I don't always use the reduced fat ingredients. So feel free to fatten it up or down. Also I find it really doesn't matter if your broccoli is cooked before or not. It will soften up enough when you bake it, but please do rinse it well.

Chicken Stuffing Bake

  • 1 can (10-3/4oz) condensed reduced-fat reduced-sodium cream of mushroom soup undiluted
  • 1 cup fat-free milk
  • 1 package (6oz) stuffing mix
  • 2 cups cubed chicken breast
  • 2 cups fresh broccoli florets, cooked (uncooked if you like it on the crunchier side)
  • 2 celery ribs, finely chopped
  • 1 1/2 cups (60z) shredded reduced-fat Swiss cheese, divided
  1.  In a large bowl, combine soup and milk until blended.
  2. Add stuffing mix with contents of seasoning packet, chicken, broccoli, celery, and 1 cup of cheese and mix.
  3. Transfer to a greased 13in x 9in baking dish.
  4. Bake uncovered at 375degrees for 20 minutes or until heated through.
  5. Sprinkle the remaining cheese on top and bake for an additional 5 minutes or until cheese has melted.
Yields: 8 servings
Nutrition facts: 1 cup equals 247 calories, 7g fat (4g saturated fat), 42mg cholesterol, 658mg sodium, 24g carbohydrate, 3g fiber, 22g protein
From Comfort Food Diet

Friday, March 26, 2010

Any one need a conversion chart?

I found this today. Super helpful for those of you who may need it.

Conversions for U.S. and Metric

U.S. CUPS TO GRAMS

All-Purpose Flour and Confectioners' Sugar

1/8 cup = 15 grams
1/4 cup = 30 grams
1/3 cup = 40 grams
3/8 cup = 45 grams
1/2 cup = 60 grams
5/8 cup = 70 grams
2/3 cup = 75 grams
3/4 cup = 85 grams
7/8 cup = 100 grams
1 cup = 110 grams

Brown Sugar

1/8 cup = 25 grams
1/4 cup = 50 grams
1/3 cup = 65 grams
3/8 cup = 75 grams
1/2 cup = 100 grams
5/8 cup = 125 grams
2/3 cup = 135 grams
3/4 cup = 150 grams
7/8 cup = 175 grams
1 cup = 200 grams

Butter or Margarine

1/8 cup = 30 grams
1/4 cup = 55 grams
1/3 cup = 75 grams
3/8 cup = 85 grams
1/2 cup = 115 grams
5/8 cup = 140 grams
2/3 cup = 150 grams
3/4 cup = 170 grams
7/8 cup = 200 grams
1 cup = 225 grams

Cake Flour

1/8 cup = 10 grams
1/4 cup = 20 grams
1/3 cup = 25 grams
3/8 cup = 30 grams
1/2 cup = 50 grams
5/8 cup = 60 grams
2/3 cup = 65 grams
3/4 cup = 70 grams
7/8 cup = 85 grams
1 cup = 95 grams

Cocoa

1/8 cup = 15 grams
1/4 cup = 30 grams
1/3 cup = 40 grams
3/8 cup = 45 grams
1/2 cup = 60 grams
5/8 cup = 70 grams
2/3 cup = 75 grams
3/4 cup = 85 grams
7/8 cup = 100 grams
1 cup = 125 grams

Flaked Coconut

1/8 cup = 10 grams
1/4 cup = 20 grams
1/3 cup = 25 grams
3/8 cup = 30 grams
1/2 cup = 40 grams
5/8 cup = 45 grams
2/3 cup = 50 grams
3/4 cup = 60 grams
7/8 cup = 65 grams
1 cup = 75 grams

Granulated Sugar

1/8 cup = 30 grams
1/4 cup = 55 grams
1/3 cup = 75 grams
3/8 cup = 85 grams
1/2 cup = 115 grams
5/8 cup = 140 grams
2/3 cup = 150 grams
3/4 cup = 170 grams
7/8 cup = 200 grams
1 cup = 225 grams

Grated Coconut

1/8 cup = 10 grams
1/4 cup = 25 grams
1/3 cup = 35 grams
3/8 cup = 40 grams
1/2 cup = 50 grams
5/8 cup = 60 grams
2/3 cup = 65 grams
3/4 cup = 75 grams
7/8 cup = 85 grams
1 cup = 100 grams

Ground Almonds

1/8 cup = 20 grams
1/4 cup = 40 grams
1/3 cup = 55 grams
3/8 cup = 65 grams
1/2 cup = 85 grams
5/8 cup = 105 grams
2/3 cup = 110 grams
3/4 cup = 130 grams
7/8 cup = 150 grams
1 cup = 170 grams

Slivered Almonds

1/8 cup = 10 grams
1/4 cup = 20 grams
1/3 cup = 25 grams
3/8 cup = 30 grams
1/2 cup = 40 grams
5/8 cup = 50 grams
2/3 cup = 55 grams
3/4 cup = 60 grams
7/8 cup = 70 grams
1 cup = 80 grams

Thursday, March 25, 2010

Triple-Chocolate Cranberry Oatmeal Cookies

I love love love these cookies so much. I probably make them every holiday season or for every party I go to. No one seems to mind though. The original recipe calls for chocolate to be drizzled over the top. I don't think it needs that because they are quite perfect the way they are. Sometimes... it can be a little bit of a chocolate overload with the added chocolate on top. These are just right. Enjoy!

Triple-Chocolate Cranberry Oatmeal Cookies

Ingredients
  • 1 cup all purpose flour
  • 1/2 teaspoon baking soda
  • 1/2 teaspoon cinnamon
  • 1/4 teaspoon salt
  • 10 tablespoons (1 1/4 sticks) unsalted butter, room temperature
  • 1/2 cup sugar
  • 1/2 cup (packed) golden brown sugar
  • 1 large egg
  • 1 teaspoon vanilla extract
  • 1 cup old-fashioned oats
  • 1/2 cup semisweet chocolate chips
  • 1/2 cup milk chocolate chips
  • 1/2 cup white chocolate chips
  • 1/2 cup coarsely chopped fresh or frozen cranberries
Directions
  1. Preheat to 350°F and line 2 large rimmed baking sheets with parchment paper
  2. Whisk flour, baking soda, cinnamon, and salt in medium bowl to blend
  3. Using electric mixer, beat butter and both sugars in large bowl until smooth
  4. Beat in egg and vanilla
  5. Add flour mixture and oats and stir until blended
  6. Stir in all chocolate chips and cranberries.
  7. Drop batter by rounded tablespoonfuls onto prepared sheets, 2 inches apart
  8. Bake cookies, 1 sheet at a time, until edges are light brown, about 16 minutes
  9. Cool on sheets 5 minutes then transfer to rack.
  10. Let them cool completely until milk chocolate sets, about 1 hour.

If you want you can make these 2 days ahead. Just be sure to store them in an airtight container at room temperature!

Adapted from Bon Appétit

Oreo and White Chocolate Blondies

I have a huge baking and cooking urge coming on. I am not sure why but I have so many idea and so many things I want to eat. Anyone else ever get like that?

I want to share with you some Oreo and white chocolate chip blondies I made a while back. I can't even remember where this recipe came from, but if I could, I would shake the hand of whoever brought it into my life.


Oreo & White Chocolate Chip Blondies
1 cup melted butter
2 cups light brown sugar
2 eggs
1 tablespoon vanilla extract
2 cups all-purpose flour
1 cup white chocolate chips
1 packet/roll of Oreos, coarsely crushed

- preheat oven to 350°F/180°C
- mix brown sugar, butter, eggs & vanilla extract
- once combined, mix in flour
- add in Oreos and white chocolate chips
- pour mixture in a buttered 9X13 pan and bake for 25-30mins

Sunday, March 14, 2010

SPRING BREAK!! Brownies...

Whether you are ending or starting spring break, these are a tasty treat.

My friend Kayla and I were rained in yesterday thanks to the horrible weather we have for spring break. But we decided it was time for some experimental cooking. You don't need to put too much effort into these brownies because like we did, you can use a box or bag mix. When you are on vacation, thing are supposed to be simple and uncomplicated. =]

You do however have to like kahlua in order to enjoy these. They do need extra time to cook, we added 5 minutes to the box time, but they come out super fudge-y and are well worth it.

So now I present you with:

Cate and Kayla's SPRING BREAK brownies.
WOOOHH!

You will need:
  • 1 box mix (we used a triple chocolate one with chocolate chips, but you could always add 1/4 cup chocolate chips to any mix)
  • eggs
  • vegetable oil
  • water
  • cooking spray
  • 2 table spoons flour
  • 1/2 cup Kahlua mocha liqueur
Instructions:
  • Gather your materials. Make sure you have legally acquired your Kahlua!
  • Preheat the oven to 350degrees!
  • Mix box mix, eggs, vegetable oil, and water as instructed by your mix of choice
  • Add Kahlua and mix. You will notice the batter has become somewhat watery; add 2 table spoons of flour to thicken it up.
  • Coat your favorite brownies pan with cooking spray. I like to use a 13x9 glass pan.
  • Bake as your mix requires for the size pan you have used, you will likely need to add an extra 5 minutes. For mine, I baked for 30 minutes. If you are unsure, stick a toothpick or fork in the middle of your brownies; if it comes out clean, they are done.
  • Remove from oven when done and allow to cool for 5 minutes if you can wait that long.
  • Enjoy the gooey fudge-y-ness!

The best thing about this is that you can substitute! Try experimenting with different types of Kahlua. Or for St. Patty's day on Wednesday, try making these with one of the many delicious flavors of Bailey's.

Happy baking, spring break, and St. Patty's day!

Tuesday, December 29, 2009

What goes great with tea?

BISCOTTI!


I am recently obsessed with making and eating biscotti. I made dozens to give away for holiday gifts with my tea. (And kept a dozen or so to eat.) Biscotti is really great for holidays and any major event because its something you can make days or even a week in advance, store it, and still have a great tasting bake good!

Cinnamon Sugar Biscotti

Yields: approx 20

You will need:
2 cups all-purpose flour
1 1/2 teaspoons ground cinnamon
1 teaspoon baking powder
1/4 teaspoon salt
2/3 cup white sugar
6 tablespoons butter
2 eggs
1 teaspoon vanilla extract
1 egg, beaten
3 tablespoons white sugar
1 teaspoon ground cinnamon

Directions:
  1. Preheat oven to 325 degrees F (165 degrees C). Line baking sheets with parchment paper.
  2. Sift together the flour, 1 1/2 teaspoon cinnamon, baking powder and salt, set aside. In a medium bowl, cream together the 2/3 cup sugar and butter. Beat in 2 eggs and vanilla. Stir in the dry ingredients.
  3. On a lightly floured surface, divide dough into two pieces. Roll each piece into a log about 9 inches long and 1 1/2 inches wide. Place logs on the prepared baking sheet and flatten slightly. Brush with the beaten egg.
  4. Bake for 25 to 30 minutes in the preheated oven, until golden and firm to the touch. Cool for 15 minutes.
  5. On a cutting board, slice each log into 1/2 inch slices, using a serrated knife. Place back on the baking sheet, cut side down, and sprinkle with a mixture of the remaining cinnamon and sugar. Return to the oven for an additional 15 to 20 minutes, until toasted. Cool on wire racks, and store in an airtight container.
Adapted from: Allrecipes.com

Friday, December 18, 2009

Coffee Cake Muffins

Since Tuesday, I have easily made over 200 of these. I've been making mini muffins for holiday parties and brunches and full sized muffins for myself for breakfast. These are hands down my favorite muffin of all times.

You will need:
  • 1/2 c. firmly packed brown sugar
  • 1/2 c. chopped walnuts or pecans (optional)
  • 2 tbsp. all-purpose flour
  • 2 tbsp. butter, melted
  • 2 tsp. ground cinnamon
  • 1 1/2 c. all-purpose flour
  • 1/2 c. sugar
  • 2 tsp. baking powder
  • 1/2 tsp. salt
  • 1/4 c. shortening
  • 1/2 c. milk
  • 1 egg, beaten
Topping:
Preheat oven to 375°F.

In a small bowl, combine brown sugar, walnuts, 2 tablespoons of flour, butter, and cinnamon; stir well, and set aside.

Muffins:
In a medium bowl, combine 1 1/2 cups flour, sugar, baking powder, and salt in a large bowl; cut in shortening until mixture resembles coarse crumbs.

Beat egg, stir in milk to combine. Stir milk and egg mixture into the dry mixture in the medium bowl. Mix quickly, about 30 seconds, until combined.

Turn mixture into a greased or paper-lined muffin pan, filling cups 2/3 full. Sprinkle topping evenly over the top of muffins.

Bake at 375°F for 15-20 minutes or until a cake tester inserted into the center of a muffin comes out clean.

Nothing better than chocolate chip cookies

I have been on a severe baking kick lately. I am going to attribute this to cold weather and the holidays. So I made these chocolate chip cookies the other day using the original tollhouse recipe. The secret to getting them to look like mine: when putting the dough on the baking sheet, measure it out one table spoon and roll it into a ball.

Happy baking!


You will need:
  • 2 1/4 cups all-purpose flour
  • 1 teaspoon baking soda
  • 1 teaspoon salt
  • 1 cup (2 sticks) butter, softened
  • 3/4 cup granulated sugar
  • 3/4 cup packed brown sugar
  • 1 teaspoon vanilla extract
  • 2 large eggs
  • 2 cups (12-oz. pkg.) NESTLÉ® TOLL HOUSE® Semi-Sweet Chocolate Morsels
  • 1 cup chopped nuts (optional)

Directions

PREHEAT oven to 375° F.

COMBINE flour, baking soda and salt in small bowl. Beat butter, granulated sugar, brown sugar and vanilla extract in large mixer bowl until creamy. Add eggs, one at a time, beating well after each addition. Gradually beat in flour mixture. Stir in morsels and nuts. Drop by rounded tablespoon onto ungreased baking sheets.

BAKE for 9 to 11 minutes or until golden brown. Cool on baking sheets for 2 minutes; remove to wire racks to cool completely.

PAN COOKIE VARIATION: Grease 15 x 10-inch jelly-roll pan. Prepare dough as above. Spread into prepared pan. Bake for 20 to 25 minutes or until golden brown. Cool in pan on wire rack. Makes 4 dozen bars.

SLICE AND BAKE COOKIE VARIATION:
PREPARE
dough as above. Divide in half; wrap in waxed paper. Refrigerate for 1 hour or until firm. Shape each half into 15-inch log; wrap in wax paper. Refrigerate for 30 minutes.* Preheat oven to 375° F. Cut into 1/2-inch-thick slices; place on ungreased baking sheets. Bake for 8 to 10 minutes or until golden brown. Cool on baking sheets for 2 minutes; remove to wire racks to cool completely. Makes about 5 dozen cookies.

* May be stored in refrigerator for up to 1 week or in freezer for up to 8 weeks.

FOR HIGH ALTITUDE BAKING (5,200 feet): Increase flour to 2 1/2 cups. Add 2 teaspoons water with flour and reduce both granulated sugar and brown sugar to 2/3 cup each. Bake drop cookies for 8 to 10 minutes and pan cookie for 17 to 19 minutes.

From: Nestle

Thursday, October 29, 2009

bakerella cake pops

Let me tell you, I absolutely LOVE bakerella's cake pops. I was checking out her blog this morning and got completely inspired to make my own Halloween cake pops. They are so fun to make and super tasty. I think this is going to be something I make again over the weekend. Last time I made them I decided it would be a good idea to double the size of the pops.. It did not prove to be a good idea at all. This is my favorite Halloween example of her work. Check out how to make cake pops of your own and her shopping list for making Halloween cake pops.

Tuesday, June 23, 2009

I feel the need to show off

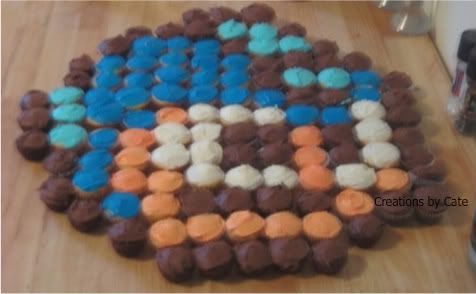
In February for my boyfriend's birthday I decided I would make him a cake and not just any cake but a cupcake cake. AND NOT JUST ANY CUPCAKE CAKE! But a MegaMan 8-bit inspired Cupcake cake!

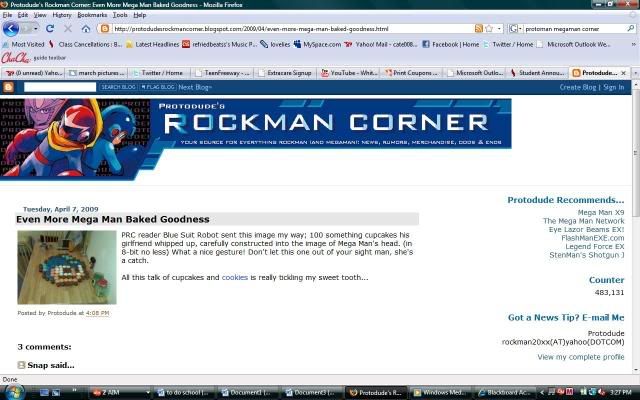
My creation keeps getting me credit with his male friends, co workers, and even fellow bloggers he shows it off too, like Protodude's Rockman Corner. Everyone seems to be so in awe of how many mini cupcakes I baked, frosted, and arranged for this birthday surprise. (By the way, it was upwards of 128+, a few for the cake and a few for the baker.)

Now, this is not the first MegaMan thing I have ever made him. Throughout the almost 10 years know we have know and dated each other, he has had a rather unhealthy obsession with this game and as any hardcore gamers girlfriend knows, there is no end to this obsession... ever. After a few years, you tend to run out of store made merchandise and video games to buy an addict, so you resort to making your own stuff. I've made him hats, embroidered shirts, collages of shirts and pictures autographed by the games creator, pj pants.. you name it I have probably made it or I am making it for the next event.

I had wanted to make a full size cake for him and decided on mini cupcakes. The only problem is I was running out of space to lay the cake out. So a quick change of plans and I arranged a head. If I hadn't run into that little problem of space I probably would have finished quicker, but from start to finish it took me a total of 4 hours! The end result was awesome and yummy and stunned my boyfriend who to this day does not stop talking about it. In his eyes I have apparently won the best girlfriend of the year award. Only problem is now I have to top myself next year. ;-)