Sunday, June 17, 2012

Zucchini Bites

I had to try this after seeing it so many times on pinterest and knowing how deeply I love zucchini. So I'll spare you the chit chat and we can get right to the action. I made mine in a regular muffin tin so of you do the same. Add an extra 5-10 minutes bake time.

Zucchini Bites


- 1 cup zucchini, grated

- 1 egg

- 1/4 yellow onion, diced

- 1/4 cup Parmesan cheese

- 1/4 cup Italian style bread crumbs, or whatever you have on hand

- salt and pepper to taste


1. Preheat oven to 400 degree F. Spray a mini-muffin tin with nonstick spray, set aside.

2. Grate the zucchini and then place in a dish towel to squeeze out the excess water, like when using frozen spinach. If you skip this part, the middle of the zucchini bites will be really soggy while the outside gets crispy.

3. In a bowl combine, the egg, onion, cheese, bread crumbs, zucchini, salt and pepper.

4. Using a spoon or a cookie scoop, fill the mini muffin cups to the top. Bake for 15-18 minutes, or until the top is browned and set. If you are using a regular muffin tin add 5-10 minutes bake time.

Wednesday, April 25, 2012

Juicing

So I'm on day two of phasing into my juice diet. (don't worry it's not a permanent liquid diet) I was going to do breakfast and lunch today but I cracked. I had a somewhat healthy sub for lunch but oh well. I need to make some major changes in my diet and really kick the processed garbage once and for all. I figure a juice diet is the best way to kick start it. No joke, when I drink my juice I feel like I have more energy and can think better. Then when I eat dinner I just feel so heavy and blah. I can't wait to see how this goes.

This is what I turned into juice this morning.

Tuesday, April 24, 2012

Strawberry-Grape Juice

Oh so damn good. I love juicing. How did I forget about this? This morning I turned this:

4 celery sticks
1 cup seedless grapes
2.5 cups of strawberries

Into this:

And enjoyed it most of the day today. Ok all of the day. I already can't wait to figure out what to drink tomorrow morning.

Monday, April 23, 2012

Carrot Celery Juice

So as I mentioned before I have been trying to get juicing back into my diet. Today I tried a new breakfast combination. After having my good bye buffalo chicken pizza last night for dinner, this breakfast truly was like day and night. Lately I haven't felt like my body was running right and I'm positive it's because of the 'fuel' I have been putting into it lately. Hopefully I will see a change soon. I'm tired of the same old same old.

So cheers to bigger better things?

Carrot Celery Juice
1. Juice 4 medium washed carrots.
2. Juice 2 celery stalks.
3. Stir and drink.

Saturday, April 21, 2012

Spring Fever

I have caught the warm weather bug. So basically I have been spending my time far away from my computer and out venturing in the sun. I know, I know. I'll be back on track soon. I have decided I need to refocus on my weight loss. I have been great with going to the gym and keeping up with it but when it comes to the diet piece of it, I am slacking.

So the long and short is that I will be incorporating juicing back into my diet. I really feel my body functions better when it's receiving as many fresh fruits and veggies and possible. I am somewhat picky when it comes to eating and sometimes I have so little time in my day I can't always make a proper meal. So back to juicing it is and no more fast food! Expect to see posts about my juicing that way if I commit to sharing it with you I will have to commit to doing it.

Hope all is well and sunny where you all are.

Saturday, April 14, 2012

Pancake sandwich

This weekend I took off to visit some of my friends in New York. It's been a while since I've seen them and I had to get out here before they move again across the country. We always do some of the most random things. This mornings breakfast was no exception.

For breakfast they introduced me to the pancake sandwich. It's probably the perfect combination of breakfast in a sandwich. Pancake. Egg. Bacon. Syrup. Pancake. So good! Probably the perfect morning munchie.

Thursday, April 12, 2012

Knitting

So with my knitting I recently became so frustrated with my stirrup socks I decided to unravel and start over. I was getting frustrated with not being able to knit 2 even socks. So now I am knitting 2 socks on a circular needle and I will never do it any other way.

I'm more than halfway done now and I am so excited. I can not wait to wear these suckers every day.

Monday, April 9, 2012

Brown Banana Bread

I swear, I need to take it easy on the bread. But its such a comfort food for me I cant help it. I have such fond memories of banana bread. I have never tried a banana bread with brown sugar so I figured I would give this one a try. I am still on the fence about it. It's not my favorite banana bread but it ranks. 

Banana Bread

Ingredients

  • 2 cups all-purpose flour
  • 1 teaspoon baking soda
  • 1/4 teaspoon salt
  • 1/2 cup butter
  • 3/4 cup brown sugar
  • 2 eggs, beaten
  • 2 1/3 cups mashed overripe bananas

Directions

  1. Preheat oven to 350 degrees F (175 degrees C). Lightly grease a 9x5 inch loaf pan.
  2. In a large bowl, combine flour, baking soda and salt. In a separate bowl, cream together butter and brown sugar. Stir in eggs and mashed bananas until well blended. Stir banana mixture into flour mixture; stir just to moisten. Pour batter into prepared loaf pan.
  3. Bake in preheated oven for 60 to 65 minutes, until a toothpick inserted into center of the loaf comes out clean. Let bread cool in pan for 10 minutes, then turn out onto a wire rack.

Friday, April 6, 2012

Strawberry Orange Bread

I have been on a total bread kick lately. I have had a bunch of dehydrated strawberries that just needed to be turned into something. So this was my answer. You don't need to use dehydrated strawberries, fresh is fine as well. 

Strawberry Orange Bread

Ingredients

Bread
  • 3 cups all-purpose flour
  • 1 1/2 teaspoons salt
  • 1 1/2 teaspoons baking powder
  • 2 1/2 cups white sugar
  • 1 1/8 cups vegetable oil
  • 3 eggs
  • 1 1/2 cups milk
  • 1 1/2 teaspoons vanilla extract
  • 1 1/2 cup chopped strawberries
  • 1/4 cup orange juice
Optional Icing Mixture
  • 3/4 cup confectioners sugar
  • 1/4 cup lemon juice

Directions

  1. Preheat oven to 350 degrees F (175 degrees C). Grease three 8x4 inch bread pans.
  2. In a large mixing bowl, stir together the flour, salt, baking powder, poppy seeds and 2 1/2 cups white sugar. Add the eggs, milk, oil, orange juice, vanilla and lemon extract; mix until smooth, about 1 minute. Pour batter evenly into the prepared pans.
  3. Bake at 350 degrees F (175 degrees C) for 50 to 55 minutes, or until a toothpick inserted into the center of the loaves comes out clean. Cool loaves in the pans for 10 minutes before removing to a wire rack.
  4. If you want an icing mixture, combine lemon juice with confectioners sugar a tablespoon at a time and stir well. Pour this mixture over the loaf while it is still hot. Allow loaf to cool completely before serving.

Tuesday, April 3, 2012

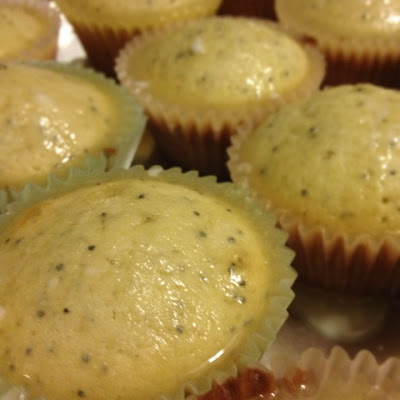
Lemon Poppy Seed Bread

So it's been entirely too long but I have been somewhat busy. A few weeks ago a favorite and best friend of mine was in town for her birthday weekend. During her stay her family threw her a brunch to which I was invited and thought, awesome excuse to bake something delish.

So I have made this recipe a few times and I keep tweeking it. This mixture seemed to go over well. I was able to make some muffins and a loaf. Just because I like variety.

Lemon Poppy Seed Bread

Ingredients

Bread
  • 3 1/2 cups all-purpose flour
  • 1 1/2 teaspoons salt
  • 1 1/2 teaspoons baking powder
  • 1 1/2 tablespoons poppy seeds
  • 2 1/2 cups white sugar
  • 1 1/8 cups vegetable oil
  • 3 eggs
  • 1 1/2 cups milk
  • 1 1/2 teaspoons vanilla extract
  • 1 1/2 teaspoons lemon extract
Icing Mixture
  • 3/4 cup confectioners sugar
  • 1/4 cup lemon juice

Directions

  1. Preheat oven to 350 degrees F (175 degrees C). Grease three 8x4 inch bread pans.
  2. In a large mixing bowl, stir together the flour, salt, baking powder, poppy seeds and 2 1/2 cups white sugar. Add the eggs, milk, oil, vanilla and lemon extract; mix until smooth, about 1 minute. Pour batter evenly into the prepared pans.
  3. Bake at 350 degrees F (175 degrees C) for 50 to 55 minutes, or until a toothpick inserted into the center of the loaves comes out clean. Cool loaves in the pans for 10 minutes before removing to a wire rack.
  4. Combine lemon juice with confectioners sugar a tablespoon at a time and stir well. Pour this mixture over the loaf while it is still hot. Allow loaf to cool completely before serving.

Sunday, March 4, 2012

I'm melting!

I'm pretty sure I broke my blow dryer making this. Hopefully not because I wasn't done.

Thursday, March 1, 2012

Easy Chicken Pot Pie

Chicken pot pie brings back some special memories for me everytime I see it or eat it. I always remember being a child and asking my dad on Sunday nights what was for dinner and he would reply, "chicken pot pie and I don't care" every time. It was a Sunday night staple when I went to see my dad and I love it. Back then thought it was usually willow tree chicken pie and a side of vegetables. This recipe puts it all together as one and takes almost no time at all to prepare.

Easy Chicken Pot Pie

Ingredients:
  • 1 can (10 3/4 oz) condensed cream of chicken soup, undiluted
  • 1 can (10 3/4 oz) condensed cream of mushroom soup, undiluted
  • 1/2 cup milk
  • 1/2 teaspoon dried thyme
  • 1/4 teaspoon of pepper
  • 1/8 teaspoon of poultry seasoning
  • 2 packages (16 oz each) of frozen mixed vegetables, thawed
  • 1 1/2 cups cubed cooked chicken
  • 1 package of jumbo biscuits
  1. In a large bowl combine the soups, milk, thyme, pepper, and poultry seasoning. Stir in vegetables and chicken.
  2. Transfer to a greased 13x9 greased baking dish. Top with jumbo biscuits.
  3. Bake uncovered at 350degrees for 40-50 minutes or until filing is bubbly and biscuits are golden brown.

Tuesday, February 28, 2012

Valerian Tea

Some people forget that some of the strongest and most powerful ways to relax come from things we find in nature. Many people either don't have the time or need a quick fix. But if you can take the time to take pleasure in herbal recipes, you will find it's worth the extra time.

For my birthday this year my closest friend Katie gave me a wonderful book filled with herbal recipes and some herbs to make a valerian tea. At the time, and still now I have been going through a period in my life where I find my self extremely stressed and anxious more often than not. With no real triggers to pin point I can only assume that there is something off with my bodies balance. So I have been spending a lot of time trying to find different things to relax, hence the knit night and excessive tea habit. I have always known valerian root to be a "relaxing" herb if you will. Whenever I would go to my local herb and tea shop the owner would give her cat valeria root and the cat would almost immediately become relaxed. I've always wanted to try it but wanted to make sure I read more of the how to's in the book Katie got me before jumping in.

So I went for it and I was pleased, and relaxed.

Valerian Tea

Ingredients:
  • 1/2 tsp licorice root
  • 2 tsp lemon balm
  • 1 tsp valerian root
  • 1 1/2 cup water

1. Decoct the licorice root for 15 minutes. Do this by putting in a sauce pan with 1/2 cup cold water and heating on low till simmering.
2. Turn off the heat and add the lemon balm and valerian root. Allow to infuse for 45 minutes.

Valerian Root
Lemon Balm
Licorice Root
3. Strain and drink.

You can strain this from the pot or transfer it to a french press. My advice to you is that if you are going to use a french press, be sure to NOT use the same one you use for coffee to avoid the flavors mingling.

Monday, February 27, 2012

Freezeable?

A lot of people ask me how I cook, bake, prepare food for one person. I didn't always have a great system in place. I used to make a meal and that was all I ate all week for lunch and dinner because it's difficult to make lasagna for one. Over time I have made a system for myself of portions and freezer storage. This has, believe it or not, saved me money and time. I find myself spending most of the weekend, when I have free time, baking and cooking meals to my hearts content. I will make a different lunch and dinner each day and portion it out so I can freeze the remained into "frozen dinners" if you will. Then during the week I have an assortment of things to eat for lunch and dinner and I don't have to listen to people say, "Lasagna again?!"

When I do tell people what my system is, they usual say something like "I didn't think you could freeze that." So I recently came across this great blog article by a stay at home mom named Andrea. It was so through and really makes it easy for someone new to freezing to understand the ins and out. So instead of me posting all my tips and tricks, feel free to take a look at Freezeable Foods. You might even find a new trick or two to save your self the two thing we could all use more of: time and money.
This is the inside of my freezer.

Sunday, February 26, 2012

DIY Vanilla Extract

I started making my own vanilla extract when I was in college and on a much tighter budget than I am now. I did some research and found that it is extremely easy to make and super cost effective. Plus it I personally feel if gives more vanilla flavor to whatever your making that store bought extract, and saves you a bunch of money. You basically need 3 items which you can get for under $5: stick vanilla beans, liquor, and a jar. I personally save every glass jar that comes into my kitchen so I have one that I reuse to make my vanilla extract.

So what do I do?
Now all you are going to do is add these things together, shake, and wait. That simple!

What type of liquor?
For picking your liquor, I personally prefer vodka because of its neutral or flavorless quality allowing the vanilla to really do it's thing and come through. You can try experimenting with many different type of liquor, some people prefer to use rum, but whatever liquor you choose make sure it is AT LEAST 80 proof (or 40% alcohol.) I prefer 100 proof. You won't need to worry about anything having a "alcohol" taste to it because when heated sufficiently, the alcohol burns off leaving you with just the aromatic and flavorful vanilla essence.

Where can I find whole vanilla beans?
Sometimes you need to shop around for this. I find that buying from a tea shop or herb supply/holistic store is going to give you the best product and cheapest cost. I usually am able to purchase 1-3 bean for less than $1 at a tea and herb shop nearby my house. Some people have a few online sources that they like but I haven't done enough research to point you in the proper direction. If you have a great online resource for herb and spices please feel free to comment below.

How do I prepare it?
Preparing your vanilla extract is simple.

Your first step is to prepare your glass jar by sterilizing it. You can do this by placing the jar open side down in a pot of boiling water. Make sure to sterilize the lid as well. Let them boil for 10 minutes to completely sterilize. Once the jar is sterilized and cool you can prepare your extract.

For every 1-3 vanilla beans, depending on their size, you will need 1 cup of liquor. Cut the beans open lengthwise with a pair of scissors or a sharp kitchen knife to expose the beans and place in a clean glass jar that has been sterilized. The cover your beans with liquor. Make sure the jar seals tightly and give it a few shakes.

Once prepared, you will need to place the jar in a dark, cool cabinet and leave it there for around 2 months, shaking it one or two times each week. Over time you will see the liquid getting darker. (If you used rum, don't be surprised if it does not appear to get that much darker as the liquor its self is a darker color.)

After 2 months, feel free to use and enjoy it often. One of the best things about this is that you can continue to add to it by refreshing it with vanilla beans and liquor. Because it's primarily alcohol it can last a seeming eternity. So go on now, give it a try.

Saturday, February 25, 2012

Cake Balls (and Pops too!)

Tonight I am making a tried and true favorite of mine: cake balls.

I have been a huge fan of bakerella since way back in the day. (AKA when I was in high school.) Tonight when I was out shopping I found a cherry chip cake mix and thought, I have red candy melts at home. LET'S DO THIS! So here I am making cake balls/pops.
Cake Pops!

I had bought a machine to try and make them because before I thought that the process was tricky and possibly to fattening. So the idea of making just cake balls with no frosting seemed like a good idea. Let me tell you, in my opinion, this machine was a waste of my money. The balls didn't bake right and tasted smokey and we a far cry from the delishness of an original cake pop. So if anyone wants this machine, let me know. I used it once and I don't plan to use it again!

Making cake balls (or pops) is worth the extra seemingly difficult steps it may take.

What you will need is:
  • 1 box cake mix
  • 1 can frosting
  • wax paper
  • candy melts
  • sprinkles (optional)
Next you will need to follow some not so complicated steps:
  1. Bake your cake mix like you normally would and allow to cool. Once cooled, cut the cake into 4 even sections. Rub the cake together over a large bowl to crumble evenly. Add in the frosting and stir.
  2. Use your hands or a cookie dough scoop to roll the "dough" into even balls no bigger than a quarter. Place the balls on a piece of wax paper on a cookie sheet.
  3. Place the sheet in your freezer for 15 minutes to cool. After 15 minutes, transfer to your fridge and prepare your candy melts.
  4. To make cake balls, place a tooth pick in each of the balls then dip into the candy melts until completely covered. Make sure to tap off any excess. And place on wax paper or into cupcake papers. Remove tooth pick and use tooth pick to fill in the cake ball hole with candy melt. Decorate however you like or allow candy melt to harden.
  5. To make cake pops, place pop stick in candy melt to get a tiny bit on the end and press gently into cake ball. Allow to harden. Dip cake pop into candy melts and cover completely tapping the end of the pop stick gently to shake off excess candy melt. Place the end of the pop in a styrofoam block or cake pop decorating tray to allow to harden.
That's pretty much it with endless decorating possibilities! Have fun with it. It really is worth all the steps, so don't try to skip out and use a cake ball maker! These are the ones I made:

Friday, February 24, 2012

Repeats!!

Tonight I was super lazy and tired so I decided to redo a recipe I previously did. Minty chippy brownies never disappoint! It had been a long day at work so I decided I needed a reward. This would be it.

Tuesday, February 21, 2012

Random Rant - kandi bracelets

So lately I have been seeing a lot of people online selling 'raver' bracelets or 'kandi' jewelry. I hate to be a Debbie downer but I am completely against this. It's over priced plur wear. The original point of kandi was to be a homemade item by the individual to exchange with new friends they met by exchanging the kandi kiss, handshake, or just trading as a way to remember each memory of each new person in the community met. Buy and selling in my opinion defeats the purpose because the jewelry is not make by you for another individual with love. You may as well have bought them an item from hot topic or something because the whole purpose behind the bracelets is defeated. Not to mention, the cost of plastic beads and string is so dirt cheap the cost of one bracelet is equal to the cost of supplies to make 100+ bracelets.

Some people will say well this 3d bracelet is a lot of beads and took a long time to make. Yeah well, years back believe it or not we traded bracelets of equal value or gave a bigger flashier bracelet to our closest friends and loves of our life. Selling his jewelry just rips away any meaning he community gave to it. Think about it.

I'd love to hear your thoughts on this. Personally thought, I am sticking to my stance on the issue.

Monday, February 20, 2012

Crockpot Kale Soup

I am the soup queen in the winter. It's magically all I crave and all I want to eat. Warm. Delish. Soup. So with today being a holiday and a day off from work I decided to make some soup to last me for the next two weeks or so. I mean in all honesty, I wind up freezing 90% of what I make and soup is no exception. 

When it comes to soups it is a labor of love but there is no need to over-complicate it. Feel free to swap things in and out as you please. If you want to make a vegetarian kale soup, leave out the meats and use vegetable stock or just plain old water. One of the things you may want to do however, is soak your beans over night. Why? Because let's face it, beans can make you gas-y. If you want to cut down on some of that believe it or not, soaking beans can help remove indigestible complex sugars. It will also significantly cut down on your cooking time preserving nutrients and proteins that makes beans so beneficial. All you need to do is rinse and sift through your beans like you normally do and then cover with and leave to soak over night. In the morning rinse them and you are good to go.

Kale after being prepped
Sliced Potatoes
These are the meats I used

Another thing I do to save some prep time is make the most out of my prep machine. I love my prep machine. If you don't have one and cook often, consider getting one. All I needed to do for this recipe, is peel and prep the veggies and meats, pop in my slicing disc, and send everything through the machine. Even the kale and potatoes. Plus the thinner the potatoes the fast they cook.

So, this is the recipe I used. Feel free to adapt it and make it your own after all, that's half the fun right?

Crock Pot Kale Soup
Your crockpot will look full once everything is added and raw
for a 5 qt crock pot

Ingredients:
  • 1/2 head of kale, chopped
  • 1 medium onion, sliced
  • 3 carrots, sliced
  • 2 potatoes, cubed or sliced
  • 2 links of linguica, sliced
  • 2 links of chorizo, sliced
  • 2 cups red kidney beans, soaked
  • 5 cloves garlic, minced
  • 32oz organic beef flavored culinary stock (substitute with bouillon cubes)
  • Water
  • Salt and Pepper to taste
Steps:
  1. Add stock to crockpot. Add in ingredients one by one stirring after each addition. Cover ingredients with water.
  2. Set crock pot to high for 6 hours or low for 10 hours and wait.
  3. Add salt and pepper to taste and enjoy.

The finish product.

Sunday, February 19, 2012

Strawberry Muffins

I meant to post this a while back but completely forgot. It has been a super busy past few weeks. Maybe two or so weeks ago my friend Emily crashed at my house. She had been going through a really rough in her life and I was trying to think of what I could do to brighten her morning. Well, can I say, nothing cheers me up quite like a delish dish. So I baked her breakfast. We both are unnatural red heads so I wanted to go with something red or pink, so strawberry muffins it is. The only thing I did different than the below recipe is that I used dehydrated strawberries. I have been dehydrating a lot lately because I am a single person who loves a vast variety of fruits but never can seem to eat them fast enough. Hence, dehydrating and storing.

Any way, with out further adue:

Strawberry Muffins

Ingredients

  • 1/4 cup canola oil
  • 1/2 cup milk
  • 1 egg
  • 1/2 teaspoon salt
  • 2 teaspoons baking powder
  • 1/2 cup white sugar
  • 1 3/4 cups all-purpose flour
  • 1 cup chopped strawberries

Directions

  1. Preheat oven to 375 degrees F (190 degrees C) oil an 8 cup muffin tin, or use paper liners.
  2. In a small bowl, combine oil, milk, and egg. Beat lightly. In a large bowl, mix flour, salt, baking powder and sugar. Toss in chopped strawberries and stir to coat with flour. Pour in milk mixture and stir together.
  3. Fill muffin cups. Bake at 375 degrees F (190 degrees C) for 25 minutes, or until the tops bounce back from the touch. Cool 10 minutes and remove from pans. 
FYI: I use a dough scoop to make my muffins into more small ball like entities.  Then I wind up with more muffins and smaller servings, since I am trying desperately to lose weight.

Nutritional Information 

Amount Per Serving  Calories: 233 | Total Fat: 8.2g | Cholesterol: 28mgAllRecipes.com

Saturday, February 4, 2012

Rainbow Sugar Cookies

I have been so stressed lately with trying to plan a vacation. I know sugar cookies are the last possible things I should be making or eating but I felt the need. I think by adding some rainbow colors to them I made them more fun and more difficult to resist. So good when warm. Milk. mmm.. Anyway.. I made them. I think truth be told I just wanted an excuse to use my new dough scoop. So much easier to scoop things into perfect yummy balls. Truly helps the perfectionist in me.


I don't regret it. I'll just go for a long walk now to try and work off the half dozen or so I inhaled. 


Rainbow Sugar Cookies

Ingredients

  • 2 3/4 cups all-purpose flour
  • 1 teaspoon baking soda
  • 1/2 teaspoon baking powder
  • 1 cup butter, softened
  • 1 1/2 cups white sugar
  • 1 egg
  • 1 teaspoon vanilla extract
  • 1 cup rainbow sprinkles

Directions

  1. Preheat oven to 375 degrees F (190 degrees C). In a small bowl, stir together flour, baking soda, and baking powder. Set aside.
  2. In a large bowl, cream together the butter and sugar until smooth. Beat in egg and vanilla. Gradually blend in the dry ingredients. Add sprinkles. Roll rounded teaspoonfuls of dough into balls, and place onto ungreased cookie sheets.
  3. Bake 8 to 10 minutes in the preheated oven, or until golden. Let stand on cookie sheet two minutes before removing to cool on wire racks.

Wednesday, February 1, 2012

Knit Night

Tonight was another successful knit night. It's funny because I feel like I get a lot done because I've blocked off time to be there and get it done but I feel like I haven't got a lot done because I have such a good time socializing. I need that though. Somedays my work is so stressful and I just need that 3 hours to knit with people who aren't as stressed as I am and are just having fun knitting. I found another knit night close to me but it's in a library. I like my rowdy knit night. I don't exactly plan on switching groups ever.

So here's my current project progress:

Sunday, January 29, 2012

Sundried Tomato Basil Bread

I have been searching the world over for the perfect tomato basil bread. This one, cold very well be it. It's been a lengthy process to make this bread and it was well worth it. To get the best taste of tomato I opted for dehydrating tomatoes instead of buying sun dried tomatoes. It has been a full day affair but my house smells yummy and the bread.. oh divine!

Sundried Tomato Basil Bread


  • 2 hrs
  • 2 hrs 15 min
  • 1 8 x 4-inch loaf

Ingredients

  • 1 cup warm water
  • 2 tbsp olive oil
  • 3 cups unbleached all-purpose flour
  • 2 tsp sugar
  • 1 1/2 tbsp chopped dried basil
  • 1/2 cup chopped sundried tomatoes
  • 1/2 tsp salt
  • 2 1/4 tsp active dry yeast

Directions

  1. Dissolve yeast in warm water in the bowl of stand mixer. Add 2 cups of the flour and all other ingredients to the batter and mix with dough hook until just combined.
  2. Add remaining flour a little bit at a time until dough no longer sticks to the sides of the bowl.
  3. Remove dough from bowl and place in a clean, lightly-greased bowl, cover and let rise until doubled. This will take approximately 1 hour.
  4. Punch down risen dough and shape into an oval, stretching from the top of the loaf to underneath the bottom. Place shaped loaf in a lightly-greased 8 x 4-inch loaf pan, cover and let rise until doubled. (about 30 minutes.)
  5. Preheat oven to 350 degrees F. Bake 15-20 minutes until golden brown. Remove from oven and allow to cool completely on a wire rack before slicing.

Saturday, January 28, 2012

'A boy broke my heart last night.. again' Smoothie

My friends are not going to be surprised that this same boy broke my heart again. It happens so often its almost sad. I wish he could just wake up and decide that this is where he belongs, but that would just be too easy. So I woke up in a funk and I am determined to not eat cookies and brownies and ice cream all day. I'm trying to lose weight and even though I am sure I will be baking a batch of something sweet later today, I need to still keep my focus.

Enter my breakfast today. Sweet sweet smoothie. I almost reached for the processed breakfast sandwich in my freezer but then I was like, NAH! Grabbed my chocolate protein, a banana, and an orange and made some tasty beverage.  The orange you can either do one of two things with: peel and blend or peel and juice. All depends on whether you like pulp or not. I have never been a fan of pulp so I busted out my juicer. For those of you who don't have a juicer, there is nothing quite like freshly juiced vegetables and fruits. You will find yourself avoiding buying juices after a while because its much tastier to have a natural fruit or vegetable juice without added sugar and ingredients you cant pronounce.

Anyway, it's a tastier treat and is hitting my chocolate craving. Just what the doctor ordered.

Chocolate Banana and Orange Smoothie
aka 'A boy broke my heart last night... again' Smoothie

Ingredients
  • 1 banana
  • 1 medium orange
  • 1 scoop chocolate protein powder
  • 1 cup water 
Option 1
  1. Add water and banana to blender and blend. While blending, pour in protein powder.
  2. Peel and juice orange with juice. Add juice to blender. Blend well and drink. 
Option 2
  1. Add water, peeled orange, and banana to blender and blend. While blending, pour in protein powder.
  2. Drink.

Friday, January 27, 2012

Minty Chippy Blondies

I had a super hankering for blond brownies (aka blondies) yesterday. I also found this bag of mint chocolate chips in my cabinet and decided to combine the two. Unfortunately I was not able to get a super great picture because when I tried to remove my blondies from the pan, they kinda fell apart and stuff because I was to excited and didn't let them cool enough or whatever. You get the idea.

Make them for yourself and you will know. Oh you will know the wonderfully delissshhhness that is blondies.

Minty Chippy Blondies

Ingredients
  • 6 tablespoons butter, softened
  • 1 cup packed brown sugar
  • 2 eggs
  • 1 teaspoon vanilla extract
  • 1 1/4 cups all purpose flour
  • 1 teaspoon baking powder
  • 1/2 teaspoon salt
  • 1 cup of mint chocolate chips (or you can substitute regular chips, butterscotch, or whatever flips your lid)
  1. In a  large mixing bowl, cream butter and brown sugar until light and fluffy. Add the eggs, one at a time, beating well. Beat in vanilla. 
  2. Combine flour, baking powder and salt. Gradually add to the creamed mixture until blended. Stir in chocolate chips
  3. Spread into a greased 11x7 baking pan. Bake at 350 degrees for 25-30 minutes or until toothpick inserted in center comes out clean. Cool on a wire rack.

Thursday, January 26, 2012

Beef and Spinach Lasagna

Excuse the terrible cell phone food porn. I wish my camera was not missing. I am totally obsessed with this lasagna. OBSESSED! I went back and forth between what I wanted to have for dinner. Whether I should order out or just make this lasagna. I decided on making lasagna and I am so glad that I did. I totally was craving this. You know when you have a bad day and you are just craving a comfort food. This day, this food. Spot, hit. Haha. Sorry I'm so corny. I'm sharing the 'diet' version of the lasagna. I didn't make the 'diet' version this time. So feel free to do the 'diet' lasagna or not. Either way its yummy noms.

Beef and Spinach Lasagna

Ingredients
  • 1 lb lean ground beef
  • 1 medium onion chopped
  • 2 jars of 26oz meatless spaghetti sauce
  • 4 garlic cloves, minced
  • 1 teaspoon dried basil
  • 1 teaspoon dried oregano
  • 1 package (10oz) frozen chopped spinach, thawed and squeezed dried
  • 2 cups ricotta cheese
  • 2 cups (8oz) shredded part-skim mozzarella cheese, divided
  • 9 no cook lasagna noodles
  1. In a large skillet, cook the beef and onion until meat is browned. Drain.
  2. Stir in the spaghetti sauce, garlic, oregano, and basil. Bring to boil. Reduce heat, cover and simmer 10 minutes.
  3. In a large bowl, combine spinach, ricotta, and 1 cup mozzarella.
  4. Spread a thin layer of meat sauce in a greased 13x9 baking dish. Top sauce with 3 noodles. Spread layer of sauce over noodles and spread to cover noodles. Layer with half of the spinach mixture. Repeat layers. Top with remaining noodles, sauce, and mozzarella.
  5. Cover and bake at 375 degrees for 30 minutes. Uncover and bake an additional 10-15 minutes or until bubbly. Let stand for 10 minutes before cutting.
Serves 12
Nutrition Facts: 1 piece equals 281 calories, 11g fat (6g saturated fat), 50mg cholesterol, 702mg sodium, 26g carbohydrate, 3g fiber, 20g protein.

Recipe and Nutrition Information from The Comfort Food Diet

Wednesday, January 25, 2012

Knit Night

Tonight I went to my first knit night, a 3 hour knitting affair in *gasp* public. Honestly, it went quite well. Of course it has been well over 2 years since I have knitted anything more than a scarf so my stirrup sock pattern looked like mumbo jumbo to me. Luckily there were plenty of people willing to help re-teach me purling and such. I am such a noob its silly. I somehow found it to be so relaxing, even though I stitched and un-stitched the same 3 rows for almost 3 hours. (Why yes I had a long day at work...) But I finally ended the evening with my socks hem complete and two rows into the neck of the sock. Success!
Don't shake your head! Haha!

I hadn't been into the yarn store ever and was impressed. I pass it frequently as its relatively close to my long term ex boyfriends parents/his house. I of course fell in love with these expensive skeins of yarn. Oh so beautiful. I would love to just buy a $42 skein of hand dyed, multitexture, multifabric, multiawesome yarn and make a $42 scarf. I'd wear it every day. Truly. There was this one skein I held most of the night because I wanted it so bad. It reminded me terribly of India in that way that only a textile can bring you back to a fond memory. Pay day is Friday. I have a feeling I will be making a $42 scarf soon. Even if its just for the memories I will make and remember each time I look at it.

Oh I am SUCH an emotional train wreck. And I mean that in the best way possible...


Tuesday, January 24, 2012

Ginger-Carrot Soup

If you don't care for ginger and don't really like carrots, you might want to stop reading now.

Tonight I decided I needed a soup. One I haven't enjoyed in a long time. Enter ginger-carrot soup. The ingredients listed below are as the recipe calls for them. I have a bad habit of never measuring things for soups or stews. I usually just grab 2.5lbs of carrots, 1/2 a large onion, and 2inches of ginger root. Tonight I also substituted the vegetable broth with chicken broth because it was all I had and I was entirely to tired to run to the store. I truly tasted no difference. Also I omitted the sour cream topping because I didn't feel it was entirely necessary, and my lazy butt didn't have any. =]

This is such an easy soup to make and it reheats well. So I doubled the recipe and I'm freezing 3/4 of it. Since I am a single lady, I do this with a lot of stuff so I essentially have a freezer full of frozen foods I can reheat whenever. Cheaper than frozen dinners, healthier, and tastier too.

CAUTION: When you are blending, please please please be careful. If your blender doesn't seal well and you don't wait a little bit for your mixture to cool you might have an explosion of gingery carrot goodness all over your kitchen! Since I doubled my batch, when I got to the second blender-full I got lazy and didn't wait for my mixture to cool a little bit before attempting to overfill my blender. So even though my blender has a great seal, I made a mess.

Ginger-Carrot Soup

Ingredients

  • tablespoon olive oil
  • 1/4 cup yellow or white onion, chopped
  • tablespoons ginger, peeled and grated
  • 3 1/2 cups carrots, peeled and chopped
  • cups vegetable broth
  • 1/4 teaspoon nutmeg, ground
  • 1/2 teaspoon salt
  • Reduced fat sour cream and chopped green onions for topping (optional)
 

Directions

  1. Heat olive oil in a large saucepan over medium-high heat. Add onion and cook until tender and translucent. Add grated ginger and cook until fragrant.
  2. Add carrots, broth, nutmeg and salt and bring to a boil.
  3. Reduce heat to a simmer and cook 15 minutes or until carrots are fork-tender. 
  4. Allow mixture to cool approximately 5 minutes. Carefully pour (or spoon) mixture into a blender and puree, adding water as needed to thin the mixture.
  5. Pour soup into serving bowls and top with a dollop of sour cream or yogurt and chopped green onions, if desired.

Saturday, January 21, 2012

Happy Birthday to me..

Yesterday was my 25th birthday. Yay! I had a surprisingly relaxing and good day. I got to go out to eat at one of my favorite Italian restaurants and completely pig out. Unfortunately, my blackberry decided this would be a good time to go on the fritz. I had to upgrade the operating system and lost ALL contacts that I had been collecting for the past 10years. I am super bummed out about this. Actually I am still in shock and disbelief. In any event, I have no ones contact information anymore. So please feel free to email me your contact information to: creationsbycate@gmail.com

I am asking for emails not texts because I think I am finally going to make the switch from my blackberry bold 9700 to an iphone 4S and I don't want to lose my contacts twice.

Thanks!

Thursday, January 19, 2012

Green Smoothies?

I'm not sure how many of you have heard about green smoothies/drinks but I am a pretty big fan. I never thought I would be because honestly, I don't like to eat my greens. I'll admit it. For the longest time you couldn't pay me to eat lettuce unless it was buried in a cheeseburger or drenched in Caesar salad dressing and cheese. But the older I get the more I seem to change my taste buds and food choices. I also seem to be having a terrific time keeping my weight at a reasonable number. Its unfortunate that I can no longer eat all the junk food I want and not gain a pound.

Right now my weight has peeked again. I'm at that point where I'm not the heaviest I've ever been but my current pants are getting tighter and I am refusing to go up a size. Down is the only direction my pants need to go. So I decided to get back into the only thing that seemed to help me, adding more greens to my diet. I am not the type of person who likes to sit there and enjoy a salad. I have never been that way. Maybe it's because I'm a New Englander and everything has got to be faster paced. Or maybe it's because I'm always on the road. Either way, liquifying my greens makes them easier and faster for me to consume. And I definitely consume more in a smoothie than I would in a salad.

I first started doing green smoothies when I was on a huge semi vegetarian raw vegan sort of kick. (If you are ever interested in exploring that lifestyle more thoroughly I highly recommend reading Living Raw Food by Sarma Melngailis. Truly delightful.) Obviously I have come to terms with the fact that I can not devote myself entirely to that lifestyle because I love to nom on chicken and beef. But I can incorporate elements into my life. The Green Smoothie is one of the things I am going to work to incorporate into my diet more. It's surprisingly filling, tasty, and gives me the extra boost of energy to get through the day. Sure in the beginning my coworkers were like, "what are you drinking?" But once they saw the benefits in my skin and weight the stopped with the comments.

You can add to it whatever you want. The one in the picture above, which I must admit was my first one in a long time was the following items:
  • 2 cups fresh spinach
  • 1 banana
  • 1 scoop chocolate protein powder
  • 1 cup water
Throw it in the blender. Blend well and drink. The faster you drink it the more nutrients you get from it, because as you will notice, the bright green color will turn brown if its left out. You can mix and match whatever you want in the drink and find a combination that works well for you. Dark greens are the ones most rich in nutrients and work best in this type of drink. (Kale, spinach, cilantro, etc) You can add things like agave nectar or honey to it to sweeten it up if you need to, but I find most fruits you add do the trick. Cilantro has great benefits for your health and is fantastic to add in this drink. But it's all up to your personal taste. Trial and error.

Don't be surprised if the smell of the first one you make is kind of startling. This was the first one I had made in a while and let me tell you, I was a little taken a back. I don't usually add protein powder but figured why not this time. I promise you, it was not as disgusting as it probably sounds. My mom loves to add mangos to hers and I really love adding pears or apples.

If you try it or have tried this before, what's your favorite things to throw in a green smoothie? I'll share some more of my smoothies and I'd love to try your combinations so feel free to leave them in the comments below.

Take care!

Wednesday, January 18, 2012

12 Things to do in 2012

I decided I'd do a short list of things I'd like to do in two-oh-one-two. Feel free to share some of your goals in the comments. =]

  1. Bake more
  2. Join a local knitting group
  3. Take a lampwork class
  4. Eat a vegetarian diet for a month
  5. Start a hydroponic garden
  6. Get a tan
  7. Go to local art galleries more
  8. Use food coloring like it's going out of style
  9. Lose some weight
  10. Use more holistic remedies 
  11. Read more
  12. Eat less processed food.


Saturday, January 7, 2012

Chicken Stuffing Bake

Pardon the terrible cell phone picture but this is by far the best chicken dish I have made in a long time. It's super easy and reheats well. Also it combines my favorite things: chicken, cheese, and stuff. I mean come on, who doesn't love stuffing. I got the recipe from a diet cook book, but I don't always use the reduced fat ingredients. So feel free to fatten it up or down. Also I find it really doesn't matter if your broccoli is cooked before or not. It will soften up enough when you bake it, but please do rinse it well.

Chicken Stuffing Bake

  • 1 can (10-3/4oz) condensed reduced-fat reduced-sodium cream of mushroom soup undiluted
  • 1 cup fat-free milk
  • 1 package (6oz) stuffing mix
  • 2 cups cubed chicken breast
  • 2 cups fresh broccoli florets, cooked (uncooked if you like it on the crunchier side)
  • 2 celery ribs, finely chopped
  • 1 1/2 cups (60z) shredded reduced-fat Swiss cheese, divided
  1.  In a large bowl, combine soup and milk until blended.
  2. Add stuffing mix with contents of seasoning packet, chicken, broccoli, celery, and 1 cup of cheese and mix.
  3. Transfer to a greased 13in x 9in baking dish.
  4. Bake uncovered at 375degrees for 20 minutes or until heated through.
  5. Sprinkle the remaining cheese on top and bake for an additional 5 minutes or until cheese has melted.
Yields: 8 servings
Nutrition facts: 1 cup equals 247 calories, 7g fat (4g saturated fat), 42mg cholesterol, 658mg sodium, 24g carbohydrate, 3g fiber, 22g protein
From Comfort Food Diet

Monday, January 2, 2012

Moving..

As some of you may know, in my home I have my studio where I make my jewelry and other such items. This past week I decided it was time to move it to a larger room. So needless to say my house is in shambles because I'm switching my guest room to my new studio room and such. I am hoping to have it all done by today but who knows! I just can't wait to have it all set up again and begin making all kinds of new stuff.
So I have not forgotten about you already, just simply in the middle of chaos.
=]

Happy New Year!